ReaComp
ReaComp is a compressor.
Kind: concept (effect-summary) Source: REAPER Effects Summary Guide v3.04
ReaComp is a compressor. Its most common use is for smoothing out variations in volume between the louder and quieter parts of a track or folder. It can also be used to raise (or, less commonly, lower) the overall volume of the compressed output of a track or folder. The various parameters together define and determine the characteristics of the compression, such as at what level (volume) it begins to be applied, how gently or harshly it is applied, and how suddenly or gradually it is released.

Threshold Determines the volume at which compression should be applied. In the example shown above, no compression will be used when the volume of the track is below -21.4 dB.
Pre-comp Allows the compression to gradually begin a specified number of milliseconds before the threshold is reached.
Attack Determines how quickly the compressor responds when the threshold level is reached or exceeded. A zero setting means the full compression will be applied immediately and suddenly: the greater the number of milliseconds specified, the more gradual the response.
Release Determines how quickly the compressor reduces its gain reduction when the input volume decreases.
Auto release This can facilitate using a very short release time without distortion.
Ratio Determines the extent to which the compression will reduce the track's volume above the threshold. At 1:1 there is no reduction. At 2:1, for every two decibels by which the dry signal exceeds the threshold level, the wet signal will be increased by only one decibel. At infinity:1, the volume of the wet signal will be limited at the threshold -level.
Knee size The knee size determines the range of volume (rather than a specified amount of time) which the compressor will use in applying the compression ratio. For example, with a ratio of 4:1 and a knee setting of 0 dB, the full 4:1 ratio will be applied as soon as the threshold is exceeded. With a knee size of 10 dB, the ratio will be gradually increased from 1:1 at the threshold level, eventually reaching the full 4:1 when the volume exceeds the threshold by a full 10 dB.
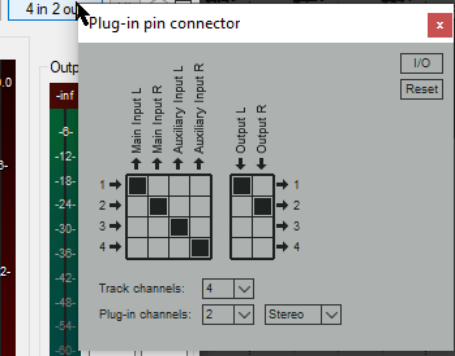
Detector input Determines whether the audio signal used to control the compression will be the track's own signal (main) or an auxiliary input signal from another track (enabled in the pin connector settings (see right). Use of the plug-in pin connector will be covered elsewhere in this guide. For normal compression detector input should be set to main. Use the auxiliary input setting for audio ducking – that is, when you want the volume on one track to be compressed according to the volume of a different track. Audio ducking, which uses sidechaining, is explained in the next section, and in more detail in the REAPER User Guide.
Low pass filter Specifies the highest frequency used to control the compressor (frequencies above this are ignored for the detection). For example, a low pass setting of 6kHz on a vocal track would ensure that the compressor is not triggered on a loud sibilance.
High pass filter Specifies the lowest frequency used to control the compressor (frequencies below this are ignored for the detection). For example, a high pass setting of 80Hz on a vocal track would ensure that the compressor is not triggered on a loud plosive.
RMS Size RMS (root mean square) is calculated according to a formula based on the square roots of a moving series of values. Think of it as being conceptually similar to a moving average. If RMS is set above 0 ms, the higher the setting the more extreme peaks and troughs in the audio signal will be smoothed out in determining the compression that is applied.
Wet This fader determines the level of the wet (compressed) audio stream.
Dry This can be used to mix any required level of the dry (uncompressed) signal back into the compressed signal.
Preview filter This can be used to audition the audio signal to assess the impact of your low pass and high pass filter settings.
Auto make up When enabled, the level of the output volume will be increased to compensate for any reduction caused by the compression.
Limit output Prevents the output level from the compressor from exceeding 0.0 dB even after any gain is added by the Wet and Dry gain faders. Different groups of parameter settings are more suitable for different types of instrument, and even different styles of music. For example, for a more dramatic, percussive effect (such as you might use on a rock drum kit) you would be likely to use more aggressive settings, such as a short attack and release times and a harder knee. For a vocal ballad, however, you would be more likely to allow longer attack and release settings and a softer knee.