General Dynamics
General Dynamics is a highly configurable general purpose dynamics processor that can function as a compressor, expander, and/or gate.
Kind: concept (effect-summary) Source: REAPER Effects Summary Guide v3.04
General Dynamics is a highly configurable general purpose dynamics processor that can function as a compressor, expander, and/or gate. The user can define a mapping of input loudness to gain directly by drawing lines and curves with the mouse. General Dynamics offers extensive controls on the input (sidechain, feedback-input, gain, RMS, attack/release), as well as the output (gain attack/release, wet/dry). Instead of using faders to determine settings such as threshold and ratio, you draw them on the graph with your mouse.
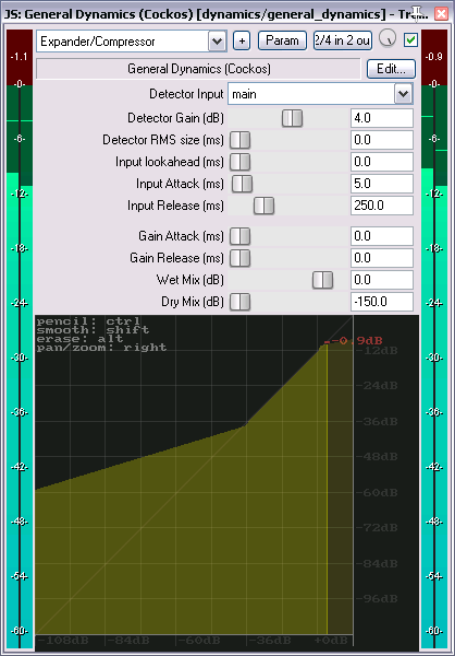
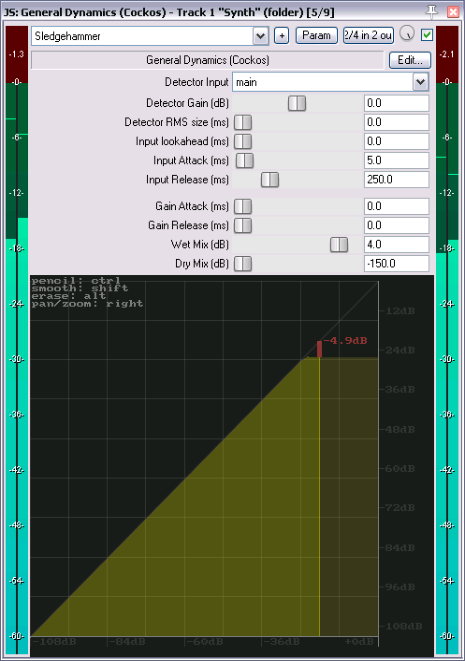
Above are shown two relatively simple examples of how this plug-in can be used. The first (left) uses first an expander for the quieter passages, and a compressor for the louder passages. The second applies sledgehammer compression at a specified volume. In many scenarios, using General Dynamics will still allow a high amplitude signal thru. You might wish to consider adding a limiter such as the JS Event Horizon Limiter to your FX chain, to prevent clipping. These are just two simple examples. It's up to you how you use this! For example, you could try this: add it to the master mix, draw a horizontal line at -12db across the whole UI, then turn the volume down of all of your tracks.
Basic mouse operations are:
Click and drag Draw straight line.
Ctrl click and drag Draw freehand.
Shift drag A blur tool. Changes sharp angle into a smooth transition (see first example above).
Click while drawing line Use Alt drag to change curve, Ctrl to commit.
Alt drag Erase
Shift right-click drag Zoom (drag up to zoom in, down to zoom out) – or use mousewheel.
Right-click drag Move graph.
These next two examples might be considered a little less conventional.
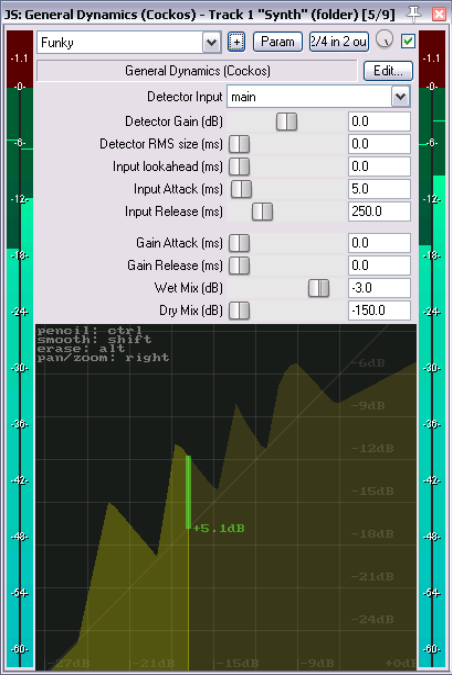
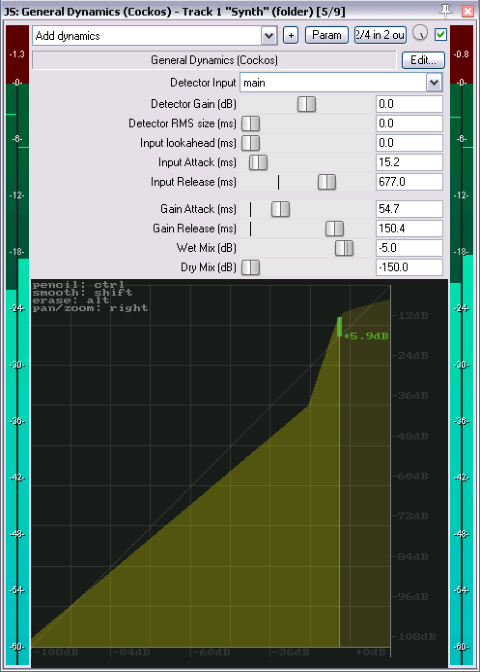
The first could be used (depending on the material to which it is applied) to add clarity to a track or mix. The second (and it is only an example, not a recommended model for any particular application or project) shows how you can create some quite funky sounds. In this case we have zoomed in quite close to enable ourselves to work more precisely in the area that interests us.
Detector Input But wait, there's more! You can change the detector input setting from main to aux or feedback.
Main can be considered as “normal” and is the default setting. General dynamics' behavior is controlled by the audio signal on the same track or item as the plug-in. This is how a compressor, expander or gate is most commonly used.
Aux means that the plug-in's behavior is controlled and triggered not by the audio signal on the same track, but by that routed in from a different track. For this to happen, a send needs to be created from the controlling track, out from channels 1/2 and in thru channels 3/4 on the destination track. This process is often referred to as “sidechaining”. You can read more about sidechaining (and other audio routing techniques) in Section 3, and in the REAPER User Guide.
Feedback should only be used with extreme caution, as the act of feeding a signal back on to itself can produce dangerously loud signals, both to your equipment and your hearing (especially if you are using headphones). Feedback uses the output of the compressor as the detector input. Depending on the curve drawn and attack/release/RMS settings, this can do different things - when expanding, GD will be more inclined to stay applying gain for longer (since the output will remain higher as the input falls), or when compressing GD will be more inclined to stop applying gain sooner (since the output will be lowered by the compression).
You should use caution with respect to the curves used in both Aux and Feedback modes, because the detector input is so strongly decoupled from the signal being processed, it is very easy for large amounts of gain to be applied to an already-loud signal.