8.1.1 Project Overview
The song Don’t Keep Me Waiting has been used to illustrate many of the concepts introduced at various stages of this primer.
Kind: concept (reamix-section) Chapter: 8 Case Study 3: Don’t Keep Me Waiting Source: ReaMix (October 2009)
The song Don’t Keep Me Waiting has been used to illustrate many of the concepts introduced at various stages of this primer. In this example, we will be looking at one possible example of a final mix. By now you should realise that there is no simple, single answer to the question, “What is a good mix?” (although it is a lot easier to define a bad one). This will depend very largely on interpretation. The example here represents one such interpretation. You should feel encouraged to try out your own.
Open the sample file Don’t Keep Me Waiting MIX 1A and immediately save it as Don’t Keep Me Waiting MIX 1B. You can now make any changes you wish to this mix, without in any way changing the settings in the original project file. Play the project file. In producing this mix, a lot of emphasis has been placed on emphasising the clarity of the different instruments, together with creating the Edgy Vocals effect that we encountered earlier. If you find that playing this file produces a crackling sound, you can try adjusting the Anticipative FX Processing settings under Options, Preferences, Audio, Buffering.
This project uses audio ducking (sidechain compression) in a slightly more sophisticated way than we have previously encountered.
Notice that the project contains two folders –
Instrument Mix
and Percussion Mix. If you check the I/O (Routing) Window for either or both of these, you will see that neither of them sends its signal directly to the Master.
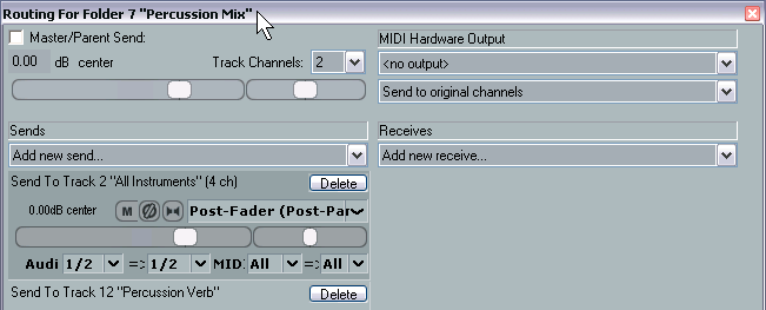
Instead, the output of both of these submixes is sent to another track called All Instruments. It is in this track that both submixes are combined before being sent to the Master. This fact can also be discerned from the Routing Matrix for this project.
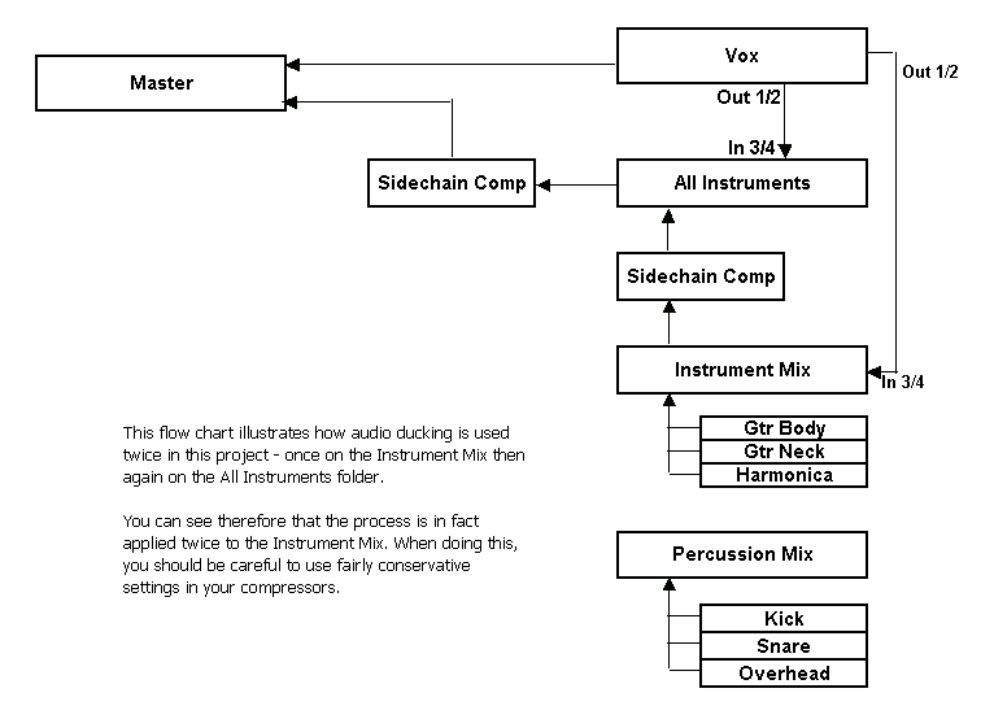
This arrangement lets us use sidechain compression in a different and clever way. By using sends from the Vox track, we are able to use the vocal for sidechain compression on not only the All Instruments track but also on the Instrument Mix folder. No sidechain compression is applied directly to the Percussion Mix folder. This enables us to control the overall level of all the musical instruments (to prevent them getting in the way of the vocals), whilst at the same time preserving as far as possible the dynamics of the percussion instruments such as the Snare. This enables them to preserve a strong presence without dominating the overall instrument mix too much. Combined with the Edgy Vocals, this aims to create an “earthy” and live performance feel.
The diagram at the top of the next page illustrates in overview this signal flow. Notice that it does not show all track FX, only those which are used for sidechain compression.
You can see that despite the fairly complex arrangements, the only feeds shown directly into the Master are from the Vox track and from the All Instruments track. (In fact, there are also feeds into the Master from the two Reverb tracks, but they are not relevant to the concept being discussed and illustrated here).
This is an area where you should tread carefully. If you experiment with making changes to the settings for the two sidechain compressors (especially the Threshold and Ratio settings), you will find that relatively small changes to the parameters can have a marked effect on the overall sound.
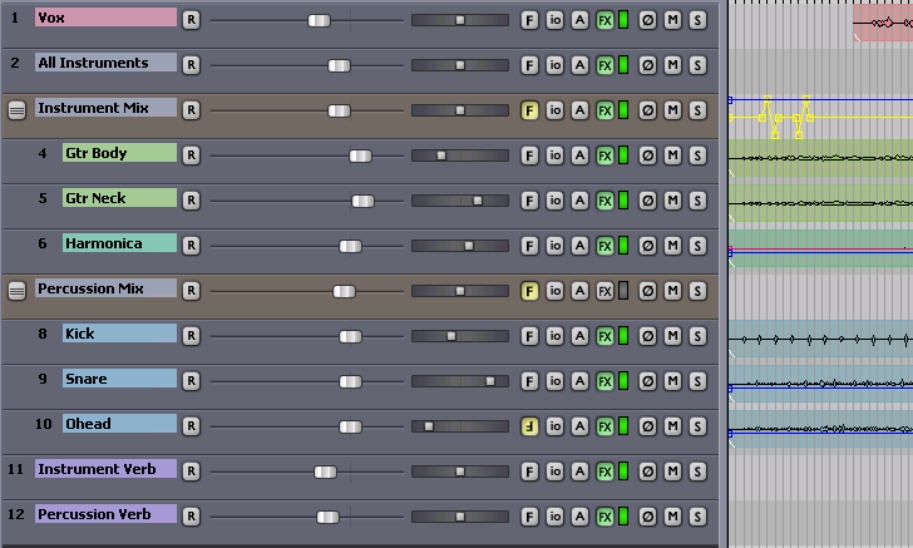
The track layout for this project is outlined below:
Finally, you can also see from the Routing Matrix that there are two additional sends that can be identified:
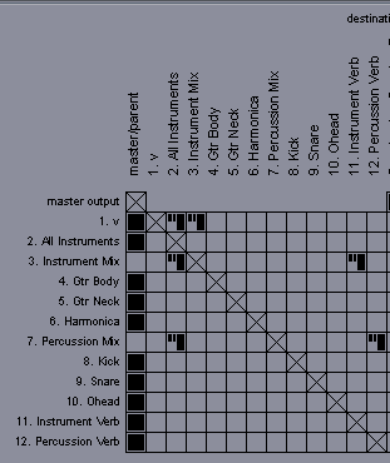
- A send from the Instrument Mix folder to the Instrument Verb track. This is used to add some reverb to the Instrument Mix.
If you wish to exercise more control over how the reverb is added to individual instruments, you could delete this send and instead add sends to the Instrument Verb track individually from each of the three tracks Gtr Body, Gtr Neck and Harmonica.
Alternatively, or additionally, you could use this technique to apply extra reverb or a different form of reverb to any of these tracks if you wished to.
- A send from the Percussion Mix folder to the Percussion Verb track. This is used to add some reverb to the Instrument Mix.
If you wish to exercise more control over how the reverb is added to individual instruments, you could delete this send and instead add sends to the Instrument Verb track individually from each of the three tracks Kick, Snare and Overhead.
Alternatively, or additionally, you could use this technique to apply extra reverb or a different form of reverb to any of these tracks if you wished to.