3.5 Channel Splitting Concepts and Techniques
Many of the examples that follow throughout this primer make extensive use of channel splitting and joining.
Kind: concept (reamix-section) Chapter: 3 Spatial Mixing Source: ReaMix (October 2009)
Many of the examples that follow throughout this primer make extensive use of channel splitting and joining. The basic idea is that by splitting a track into several channels and applying different FX to each channel before joining them up again, we can make some pretty impressive sounds.
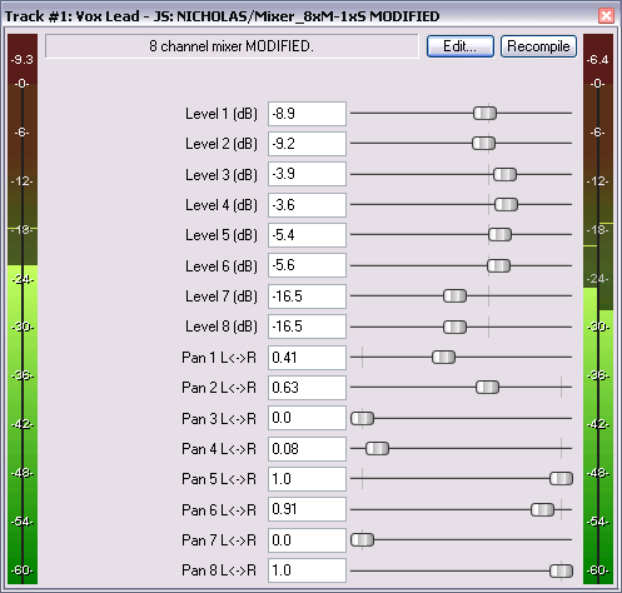
Shown on the right is one of the mixing plug-ins that we use quite extensively in some of our examples.
The beauty of mixing tools like this one is that you have at your fingertips a very easy method of putting your track together. Each of the channels (in the example shown, there are eight channels) has its completely independent volume and pan controls. As you work through these examples, you will be very pleasantly surprised, if not astounded, the first time that you discover just how much creative control this puts at your fingertips.
It’s worth taking some time to understand this clearly before you continue. In some examples, we will be using special Channel Splitter plug-ins to do this. These are relatively straightforward. However, in many cases these channel splitter plug-ins are not capable of giving us the results that we want. This is when we have to use a different, more complicated method, splitting our tracks into channels in a way that may not be immediately obvious or intuitive.
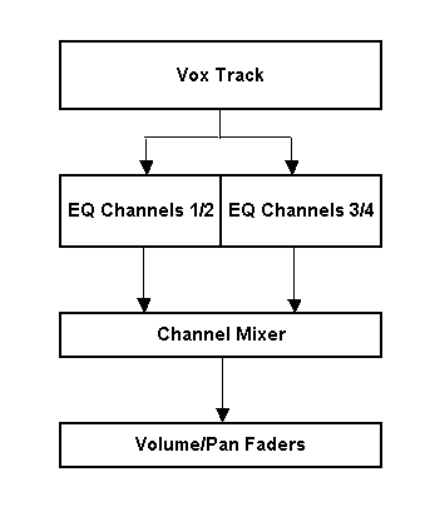
Let’s look in principle at an example of how this might be done. Suppose we were to split a Vocal Track into two pairs of channels. We could then, for example, apply separate EQ to each pair of channels (perhaps making one warmer and the other more present) and then use the Channel Mixer to pan them differently before joining them up to create a more interesting and varied vocal effect.
The diagram on the right illustrates how this might be done. The same original vocal track is passed into two separate instances of ReaEQ. Then, as the diagram shows, the output of each EQ instance is blended together using separate channel pairs in a channel mixer before being passed to the volume and pan faders.
How then is this done? The answer comes in two parts.
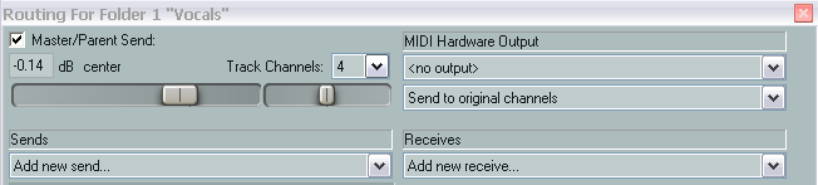
The first is that each track’s I/O Window lets you determine how many channels (and hence channel pairs) a track shall have. The default is two, but this can be changed to any number up to 64. In the hypothetical example that we are considering here, a total of four channels is needed.
The procedure for setting these up is shown on the right. You simply open the I/O window for the track and specify the number of channels required. In the example shown here, 4 Track Channels have been defined.
The second part of the answer is found in REAPER’s VST Plug-In Interface. This allows you to specify which channels are to be used for the plug-in’s inputs and outputs. In most cases, the default settings for both input and output are Channels 1 and 2.
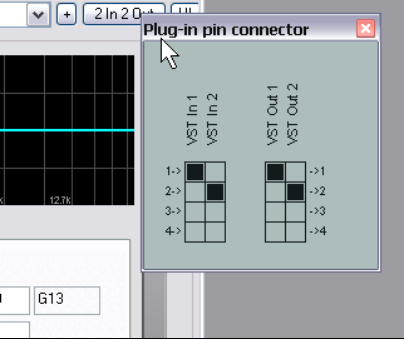
These are illustrated below, using the ReaEQ plug-in as an example:
You can click on the 2 In 2 Out button of the plug-in’s Plug-in pin connector interface to display the Routing Matrix for that plug-in. Notice that:
-
The number of channels available will be equal to the number of Track Channels that have been defined – in this example, four.
-
By default, VST In 1 will be assigned to Channel 1 and VST In 2 will be assigned to Channel 2 (as shown). However, you can change this as you wish.
-
By default, VST Out 1 will be also be assigned to Channel 1 and VST Out 2 will be assigned to Channel 2 (as shown). However, you can change this as you wish.
So, to return to the example in question.
The default input and output settings are just right for the first of our ReaEQ instances (image top right) – Channels 1 and 2 in, Channels 1 and 2 out. However, in the second instance (bottom right) we still will need to bring in the signal through Channels 1 and 2, but we need to send it out through Channels 3 and 4 – and only Channels 3 and 4.
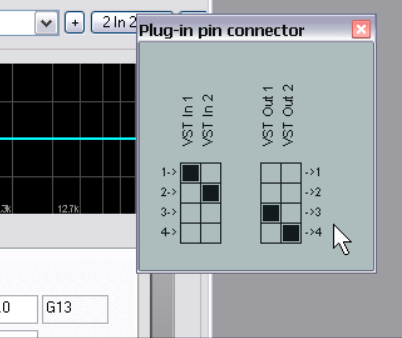
We therefore require (in this example) a second instance of ReaEQ. For this second instance, you would change the settings on the Plug-in pin connector interface as shown here on the right. VST Out 1 has been set to Channel 3 and VST Out 2 has been set to Channel 4.
Thus, by adding an additional instance of ReaEQ and routing the output through the additional channel pair, we’ve created parallel EQ processing within a single track.
Especially if you have come to REAPER from another DAW, both this concept and its implementation may seem strange or even bewildering at first. This is because most probably the whole channel splitting concept simply did not exist with your previous DAW software (at least, not for audio). Be prepared to persevere. In time you will get used to it, and you will be surprised at how easy it becomes. Remember also that once you’ve set up a
4-channel track with parallel ReaEQ instances, you can save the track as a Track Template and quickly add parallel EQ to any project.